top of page


MECHANICAL
2-stroke Engine Overhaul
Complexity: Low
Opening Thoughts
This short mechanical article speaks about the major overhaul works of a McCulloch 4730 nice yellow fishing line lawnmower, which is one of our best and very reliable target-oriented tools.
This machine is not as popular as a Husqvarna 40, but I would say it is at least almost as good as the before mentioned classic.
This story has to be started there that we are talking about a more than 20 years old device,
which worked mostly in the stronger - reedy and bushy - undergrowth from spring to autumn.
I have also worked with this tool several times and I must definitely say that I loved it very much.
Apart from the perfect mixture of fuel, proper spark plugs, clean air filters and high quality angle drive grease this machine didn't require too much care so far, although it almost always had to operate under very difficult circumstances and this device has always done its job as it should.
Among other things that’s the short reason why I didn't leave it to his fate when his crankshaft bearings flew away.

Cumulative Damages
As regards its simple but great technical structure, it has an excellent two-stroke engine with a cylinder capacity of more than 40 cubic centimeters, which delivers around 2 horsepower and that is why can already be said to be a serious machine in the category.
This engine is equipped with a great - if I remember well Walbro - single intake pipe membrane carburetor, which had even a primary pump as well.
The problem started when one of the clutch screws came loose then broke off and then because of it the crankshaft bearing on the clutch side was damaged quite seriously. Of course, at that time the machine was not completely ruined yet, but after the replacement of the broken clutch screw, it was still used a bit, but the crankshaft bearing flew off very quickly as these engines run at around 10,000 rpm, and due to the excentric movement of the crankshaft the flywheel of the ignition transformer hit down the ignition transformer which step permanently destroyed the ignition system too.
By this time this old machine was already destined to be thrown away, but in spite of all these, I applied for the task because I wanted to completely repair this old lawnmower. It also belongs to the story that instead of this machine a brand new Husqvarna 545 RX had already been ordered because no one was too confident in the successful result of the repair works.
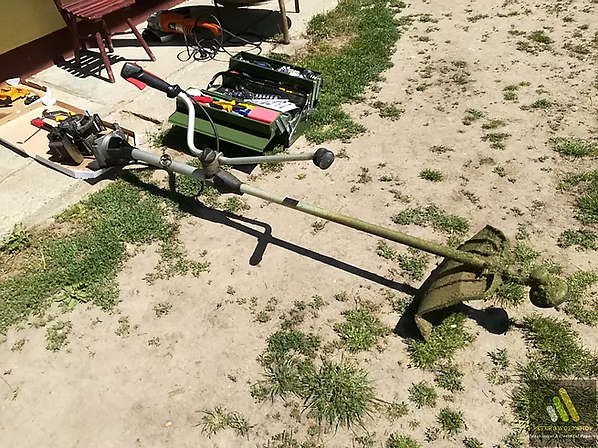
With these parameters, the situation did not seem very encouraging anyway and in addition to this the decompression valve has already been blowing out a huge amount of oil through the valve for a long time, which has been sprayed on the top of the engine like black tar, so, all in all, it was not even an aesthetically very convincing piece. The upper image already reflects the state after the complete assembly.
Complete repair Process
It is a quite cheap device compared to the premium brands but has a sufficiently robust and durable construction. I would say, it is a fairly simple structure and there are no unnecessary marketing gadgets that raise its price to the skies.
Moreover, let me note - already in the beginning - that 20 years ago there were no special oils like today, but they perfectly protected the piston as the compression was surprisingly more than enough. Yes, this is due to the perfect ratio of the two-stroke fuel mixture, which is far from the 1:50 recommended by the manufacturer, but the well-proven 1:40.
In the first step, I removed the plastic covers quickly, and then I easily disassembled - but not with the large orange flex shown in the picture - the engine from the stem at the aluminum clutch housing.

Only then could I begin to disassemble the engine, starting first by removing the flywheel fixing bolt with a pneumatic wrench. In this case it was sufficient for me to hold the drive shaft - which is also the mainshaft - by hand with only a larger piece of clothing. However, if you do not remove the spark plug before this step, the compression itself may already provide sufficient resistance against the pneumatic wrench, which may also be sufficient to unscrew the flywheel fixing bolt.
In addition to this, many more experienced machine mechanics use the smart solution to turn the piston to the top end and hang a thick shoelace in the cylinder through the spark plug hole, with several knots to hold a contraposition this way against the piston. I don’t like this solution so much because I'm a little scared - I know I shouldn’t - of the force concentrating on the piston surface at one point.
Then in the next step I removed the flywheel from the mainshaft with an enough large three-legged disc puller, and of course in this way I also removed the clutch system from the other side as well.

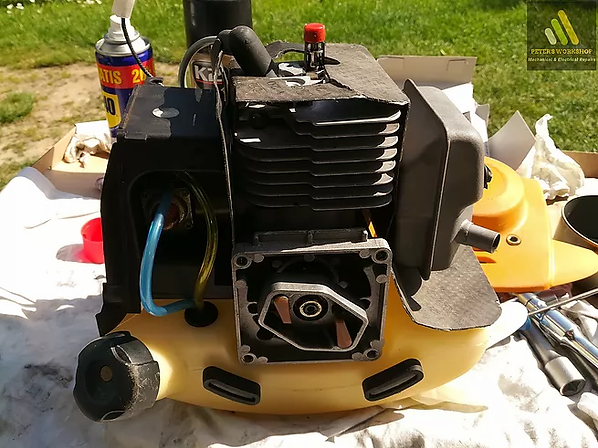
The two halves of the engine block - was glued together with factory seal - are tightened on both sides by quite long size 6 screws, and the two-stroke gap-controlled cylinder sits at the top of the engine block, which can be unscrewed nicely with a fairly long T-type imbus wrench.
I want to note here that the carburetor together with the air filter housing had already been removed from the machine when the plastic covers were removed and I put that in a separate place - as that is a very fine clockwork precision structure - for nice cleaning and renovating.
In the next step I disassembled the engine block, and this way I was already able to remove the mainshaft together with the connecting rod and piston for a very profound inspection.
Anyway, the complete mainshaft had no other serious problem at all, because it had only a very small - yet quite healthy - swinging movement, and there was no damage on the piston either. So, I already got a much nicer picture of the whole situation.

The next step was to start removing the mainshaft bearings in a very precise way using one of my favorite bearing pullers. Always take care of the seeger rings when removing the bearings, therefore, in step 0, I first removed the seeger rings from everywhere. My second important piece of advice would be to always support the bearing puller legs symmetrically and nicely evenly at the strongest points of the cast aluminum before pulling, otherwise it is very easy to break our aluminum castings, which can no longer be replaced, especially in the case of an old machine like this.
So, this way I was already able to take the exact dimensions off the bearings and I was looking for exactly such bearings in one of my favorite bearing brands.

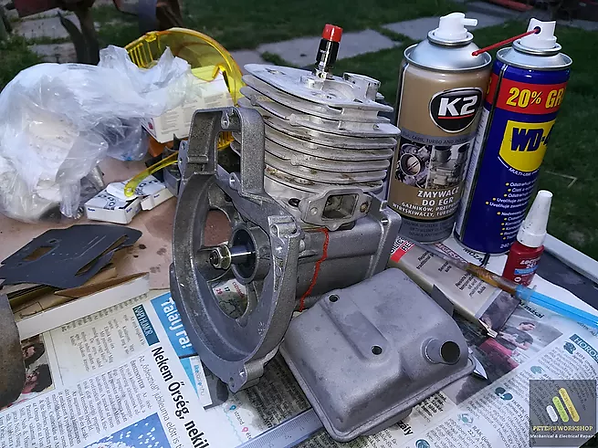
After the disassembly came the very profound cleaning phase, because it is very important for me to be able to continue working only with pharmacy-clean items. Thus, the plastic elements were washed through with eco-friendly lemon-based dishwashing detergent, while the aluminum components became a fine soda blast cleaning and the rusty iron exhaust participated in a much deeper abrasive cleaning process in the company of a few kg of medium-fine sand.
Then I inserted the brand new premium Koyo bearings into their thoroughly cleaned bearing nest very finely. This step is one of the most important, as even the slightest damage can be easily fatal to the mainshaft bearings which can rotate even about 10,000 per minute in the hot and vibrating engine block while getting a huge load from the direction of the piston. Moreover, at this very sensitive point the greatest possibility of error had to be taken into account, as the seal of the bearings must be obligatory removed from inside of the bearings in order to receive continuous lubrication during their whole service life. Whoever forgets or doesn't know this step can disassemble and restart the whole process again after the brand new bearings have broken down very quickly during the usage.

Then the joining side of the engine block halves was completely cleaned of grease to apply the high temperature tolerant sealing paste to the surfaces.
I like to lubricate all components of the cleaned crankshaft with plenty of lubricating oil so that they are well lubricated even at the first start-up too.

So now, taking care of everything, we can assemble the engine block nice cleanly and almost with pleasure, but that should not be forgotten, that it is worth leaving the fresh sealing paste to dry at least for 1 day.
Don't forget that it is worth working very precisely, because too little sealing paste will not seal enough, too much sealing paste is a waste, and when we want to peel it off afterwards, our seal can also be damaged.

When assembling, make sure that the screws are tightened to the required torque and for those bolts and screws where some kind of threadlocker glue - like Loctite 243 - has been used,
tighten them only about 20% less than the specified torque, as the original tightening torque had also been changed due to the liquid glue.
Keep in mind that no sealing paste can be placed below or above the cylinder seal, as there is a soft metal or other special sealing pads for this purpose and only use them alone.
We have to tighten all the screws very gently and evenly, taking care not to overtighten them accidentally, since on the one hand, there are only weak aluminum threads in the engineblock, on the other hand, we have to calculate with thermal expansion as well, which could very easily break the overtightened threads.

In the following few steps, we can install back the ignition flywheel, the exhaust system, and the beautifully renovated and cleaned carburetor. Anyway, I have already accurately described the exact procedure of cleaning and adjusting the membrane-controlled carburetor in the Husqvarna 40 article, so I have not detailed it here one more time.
During the reinstallation of the ignition transformer, I usually use the simple trick of placing a business card between the magnetic signal transmitter and the ignition transformer to ensure the required distance of about 1 mm between the two components, but after tightening the screws of the ignition transformer, the business card can be pulled out, and the mentioned distance of 1 mm thus remains nicely fixed this way.

I like to use plenty of Loctite 243 threadlocker glue when tightening the clutch screws to provide massive protection against an unexpected loosening because don't forget that this thing was the initial source of problems too. I think we can say that this machine will regain slowly its 100% state again, but this device really deserves this care as it has done a lot of service over the last 20 years.

I think, the end result speaks simply for itself. The lawnmower is beautifully finished with brand new Japanese premium crankshaft bearings and with many other little things.
According to its owner, this machine became as powerful as when it was still completely new,
which is partially due to the carburetor cleaning and correct adjustment as well, which - as I mentioned - I have already nicely presented in the previous article. I just forgot to say that the carburetor works completely like a clockwork again and the machine starts with just one pull.

Thank You for reading this article!
bottom of page